

This post was originally published as a column in MAA Focus (Oct/Nov 2011). The columns are no longer available online so I’m republishing here.
Even though I’ve had a tablet PC for a while now, it’s been hard to get used to grading student exams and problem sets (like exams and problem sets) in the digital world. The primary reason for the roadblock was that I usually grade one or two problems at a time, and this always seemed well-suited to grading papers in a stack, all on the same page. In past semesters I often printed the papers I had received digitally, graded them, and then scanned them to send back to students. But this summer I was teaching two sections of online Calculus while on a road trip, and it forced me to just figure out some techniques for making digital grading of exams more efficient. I’m now convinced that the digital grading has enough benefits to do it in lieu of paper-based grading, even when the students submit their work on paper. Let me explain.
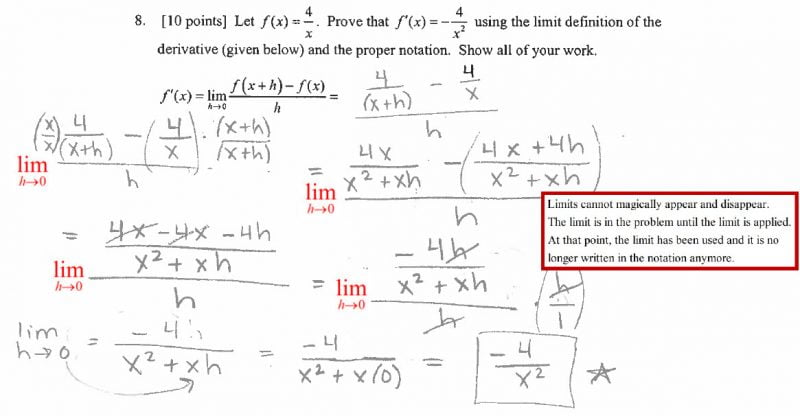
The most convincing reason to go with digital grading is that you can write a lengthy comment about a common error, save the comment as an image (or a “custom stamp”), and use it over and over again whenever you encounter the error. How you do it depends on what program you use, but to see an example of how to create digital grading stamps, visit http://bit.ly/redstamp.
When the grading is digital, you can give feedback to students as soon as the papers are graded (I email back the graded assignments). This means you will not waste class time passing out papers and then answering questions about why one student lost only 2 points and a friend lost 3 points. Questions about why a problem was graded in a particular way will be asked privately (via email) and you will always have a copy of the graded assignment. Speaking of that, the fact that you retain a copy of every graded exam and problem set makes it much easier to investigate assessment questions or conduct future research linking instructional methods to student performance. Rather than just a number in a gradebook, you can actually go back and see several semesters worth of student work on a particular type of problem.
Just to be fair, there are some cons too. The biggest issue is that you will probably need some kind of hardware to do the grading efficiently in the digital world: a tablet PC, an iPad with a stylus, or a peripheral tablet and pen (these plug in to the USB drive and “replace” the mouse while in use). You also need the papers or exams in a digital format. For problem sets this is relatively easy, just ask students to submit them digitally and give them an extra 12 hours or so on the deadline if they do so. For example , if my class meets at 10am, students can submit the assignments on paper at 10am, or digitally in Blackboard by midnight on the same day. About 90% of the students take the extra time. For the ones that don’t, I just use the copier at school to scan and send the papers as an email (most copiers made recently have this feature). Finally, you will have to take the time to return the papers digitally. This means either emailing them one by one to the individual students, or uploading them to some kind of learning management system (i.e. Blackboard, Moodle, Desire2Learn).
Tips for Managing Digital Grading
- If students will be submitting the files themselves, ask for a common format. For example, students can submit a PDF version of their files (from just about any file type they can think of) by sending their file through a free online PDF converter like PrimoPDF Online (http://www.primopdf.com/online.aspx) .
- Ask for a specific naming convention for the files. I’d suggest “Last First Assignment-name”
- Purchase or obtain software that will allow you to easily write on documents (i.e Adobe Acrobat Pro, OneNote, Jarnal).
- When you receive the files, download them into a common folder and, if necessary, rename them. I name the files “Last First Assignment-name” (see image) because it puts the files in alphabetical order by last name that makes it pretty easy to keep track of which paper you’ve just graded and which you should do next.

- If you can, format the assignments so that the same problems always fall on the same page. The easiest way to do this is to ask for a set number of problems per page. While this might seem wasteful of paper, remember the submissions and grading are going to happen digitally. This makes it easier to jump to a particular page of each assignment to grade a particular problem.
- In the File Manager, use the “List View” instead of “Icon View” to see the files alphabetically by filename.
- When you move on to grading the next paper, use the time portion of the “Date Modified” field on the file to keep track of which papers you’ve just finished and which you should grade next.
- Use the “Next page” and “Previous page” buttons to quickly navigate to the proper page for grading.
- Set up custom stamps (See http://bit.ly/redstamp for directions in Adobe Acrobat). Your comments can be longer and have more explanation than they might normally have since you will only have to write them once.
- You can open several files to the same problem at once, then decide how you might assign the points. You can use a custom stamp to explain your grading rubric if you think it will warrant questions.
- In most learning management systems, you can use an “assignment” feature that will let you download all the submitted files at once.
To grade papers one problem at a time, this is the procedure I run through.
- Open Adobe Acrobat Pro (and keep it open the entire time)
- Go to the file folder holding the papers and start with the first file (the first name alphabetically)
- Jump to the page of the problem using the Next Page button (yes, I realize I could jump right to the correct page by typing in the number of the page, but I’m using a Tablet, not a keyboard, so it’s easier to tap three times than it is to convert to a keyboard just to jump to the page).

- Use a combination of the pen tool and custom stamps to grade the problem.
- Save the file and close it (but don’t close Adobe Acrobat).
- Open the next file in the list (use the time stamp or glance at recently opened to figure out which is next). Repeat.

The ability to use custom stamps may just edge out the convenience of paper-based grading. You can include a solution for a particularly difficult problem. You can explain the grading for a problem if you know that it will warrant a lot of questions. You can add an explanation for why certain notation is necessary in a problem. You can include graphs, tables, anything you want to in your custom stamps (just use a snipping tool or a program like Jing or SnagIt to make the custom stamp images you need).
One last tip – don’t forget you can easily change your grading without making a mess. Maybe you realized you assigned too many points a problem, want to remove a comment, or decided to regrade a problem after you’ve saw the spectrum of student errors. Digital ink is much easier to erase than actual ink.
